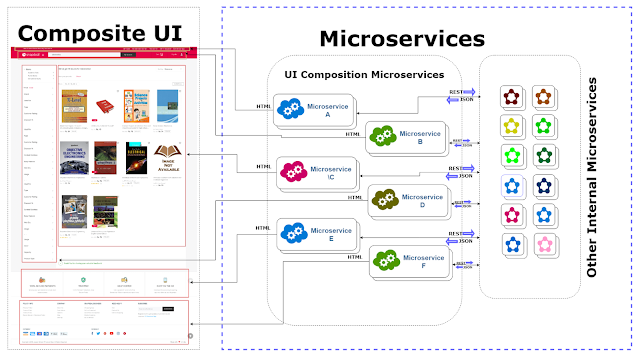
Micro-frontends are a modern approach to building complex web applications by breaking them down into smaller, independent, and loosely coupled components. In this article, we'll explore how to implement a micro-frontend architecture with Angular, one of the most popular frontend frameworks, using code examples.
Step 1: Decide on the structure of your micro-frontends
The first step in implementing a micro-frontend architecture with Angular is to decide on the structure of your micro-frontends. This includes determining the components that will make up each micro-frontend, as well as the relationships between these components.
For example, consider a web application for an online marketplace. You might choose to create a micro-frontend for the product catalog, another for the shopping cart, and a third for the customer reviews. Each micro-frontend would be responsible for its own data and functionality, and would communicate with the other micro-frontends as needed.
Step 2: Create the micro-frontends
Once you have decided on the structure of your micro-frontends, the next step is to create each micro-frontend as a standalone Angular application. This can be done by using the Angular CLI to create a new Angular project for each micro-frontend.
For example, to create a micro-frontend for the product catalog, you might use the following command:
Typescript ng new product-catalog Step 3: Share data between micro-frontends
One of the key challenges when working with micro-frontends is sharing data between the different components. To address this challenge, you can use a shared service or a message bus to pass data between micro-frontends.
For example, you might create a shared service that allows the shopping cart micro-frontend to communicate with the product catalog micro-frontend. The shared service might expose a method for adding items to the cart, which the shopping cart micro-frontend would call whenever the user adds an item to their cart.
Typescript import { Injectable } from '@angular/core';import { Subject } from 'rxjs';@Injectable({
       providedIn: 'root' })export class CartService {           private items = [];     private cartSubject = new Subject<any>();     addItem(item) {
                          this.items.push(item);
                          this.cartSubject.next(this.items);     }     getItems() {
             return this.cartSubject.asObservable();     } }
Step 4: Integrate the micro-frontends
The final step is to integrate the micro-frontends into a single application. This can be done using an application shell, which acts as the main entry point for the application and serves as a container for the micro-frontends.
For example, you might create an application shell using Angular that acts as the entry point for the online marketplace application. The application shell would include the necessary code to load each micro-frontend into the appropriate part of the page, and to manage the communication between the micro-frontends.
Typescript import { Component, OnInit } from '@angular/core';import { CartService } from './cart.service';@Component({
        selector: 'app-cart',      template: `
    <div *ngFor="let item of items">
      {{ item }}
    </div>
  `,      styleUrls: ['./cart.component.css'] })
 export class CartComponent implements OnInit {     items = [];

       constructor(private cartService: CartService) { }

       ngOnInit() {
             this.cartService.getItems().subscribe(items => {
                   this.items = items;         });     } }
In this code example, the CartComponent is a component that displays the items in the shopping cart. The component is using the CartService to retrieve the items from the cart and to subscribe to changes in the cart's contents.
Step 5: Deploy the micro-frontends
Finally, once you have implemented and integrated your micro-frontends, the next step is to deploy the application. This can be done using a variety of different tools and platforms, depending on your specific needs and requirements.
For example, you might choose to deploy each micro-frontend as a separate application on a cloud platform, such as AWS or Google Cloud. Alternatively, you could use a platform like Kubernetes to manage the deployment of your micro-frontends and ensure that they are scalable and highly available.
In conclusion, implementing a micro-frontend architecture with Angular is a great way to build complex web applications that are scalable, flexible, and easy to maintain. By breaking your application down into smaller, independent components, you can make your code more manageable and reduce the risk of issues and errors.


